
by Maria Pericozzi | Jun 8, 2023
Kitchen Safety Tips:
Let anyone around you know that you will be using the stove.
Always use a pot holder when touching hot pots.
Steam is HOT and can burn you. Slowly and carefully pour the pasta.
Step 1: Boil
Fill large pot with water, add about 2 Tbsp of olive oil and 1 tsp salt.
Cover with a lid and bring water to a boil.
If you have pre-made pesto, skip to step 5!
Step 2: Cook Pasta
Once water is boiling, add pasta to the water. Cook for as long as the box states, or keep checking to cook to your liking.
Once pasta is cooked, carefully pour everything into a colander that is placed in the sink. Rinse with cold water.
Step 3: Measure
Measure out all pesto ingredients.
Plug in blender.
Step 4: Pesto
Add all pesto ingredients into a blender, blend until smooth.
If you’re having trouble with it being too chunky, add a bit more olive oil to help smooth it out.
Step 5: Combine
Add cooked pasta to a mixing bowl with the pesto and use tongs to help combine.
Optional protein: Grilled chicken, crispy chicken, shrimp, steak, etc. – add protein to oil and cook until done before adding to pasta/pesto
Step 6: Enjoy!
Plate pasta and add protein if you’d like. Don’t forget the extra cheese on top! 😊
Enjoy!!

by Maria Pericozzi | Jun 8, 2023
Kitchen Safety Tips:
Notify anyone around you that you will be using the stove.
Make sure to use a potholder when touching pots and pans on the stove.
Step 1: Boil & Prep
Fill the bottom pot of your double boiler halfway with water.
Place on the stove over high heat until it boils.
Line baking sheet with parchment paper.
Step 2: Milk Chocolate
Break up the milk chocolate almond bark and place in the top pot of the double boiler.
Place the pot with chocolate on top of the pot with the boiling water on the stove. Periodically stir with spatula to make sure chocolate doesn’t burn.
Step 3: Pour & Freeze
Once completely melted, pour milk chocolate onto the parchment lined baking sheet and spread thin to cover.
Put the baking sheet in the freezer for chocolate to harden.
Step 4: White Chocolate
Clean the top pot that the milk chocolate was in and then add the white chocolate to that pot. Place the pot with white chocolate on top of the pot with the boiling water on the stove. Periodically stir with spatula to make sure chocolate doesn’t burn.
Step 5: Peppermint
Remove baking sheet from the freezer. Pour melted white chocolate on top of the milk chocolate and spread evenly.
Sprinkle candy cane pieces all over to cover.
Put the baking sheet in the fridge for everything to harden.
Step 6: Finish & Enjoy!
After about 10 minutes, remove the baking sheet from the fridge.
Break into pieces and enjoy!!

by Maria Pericozzi | Jun 8, 2023
Kitchen Safety Tips:
Always use an oven mitt!
If you need assistance using a stand or hand mixer, don’t be afraid to ask for it!
Step 1: Dry Ingredients
Whisk together flour, baking soda, and salt in a bowl
Preheat oven to 375 degrees
Step 2: Stand Mixer
Using a stand mixer or hand mixer, cream together the butter, peanut butter, sugar, and brown sugar.
Then add the egg, milk, and vanilla until well blended
Step 3: Combine
Gradually add the flour mixture to your dough and mix thoroughly
Step 4: Scoop
Line a baking sheet with parchment paper or spray with nonstick cooking spray.
Scoop dough into balls with an ice cream scoop or spoon and separate evenly onto the cookie sheet.
Step 5: Bake
Bake until very light brown and puffed, at least 10 minutes. Add more time if necessary.
If making blossoms, add an unwrapped Hershey kiss to each cookie, and bake an additional 2 minutes.
Step 6: Cool and Enjoy!
Cool cookies on a cooling rack or just leave out for at least 10 minutes
Enjoy!!
Store in an airtight container

by Maria Pericozzi | Jun 8, 2023
Kitchen Safety Tips:
Alert anyone around you that you will be using the stove.
Always check inside the oven before turning it on.
Always use oven mitts.
Step 1: Pre-heat Oven
Pre-heat oven to 375°
Melt Butter.
Step 2: Butter
Pour melted butter into the center of the baking dish. Do not spread butter around.
Step 3: Batter
In a bowl, whisk flour, sugar, baking powder, milk, and vanilla until smooth.
Pour batter mixture into the center of the baking dish. Do not spread mixture around.
Step 4: Peaches
Drain and rise peaches in colander under cold water.
Add drained peaches, brown sugar, and lemon juice to a skillet over medium heat. Stir constantly until sugar is dissolved.
Step 5: Finish and Bake
Pour peach mixture into the center of the baking dish. Do not spread mixture around.
Bake at 375° for about 35 minutes or until your cobbler is golden brown.
Step 6: Enjoy!
Let cool a few minutes and Enjoy!!
This dish is best paired with some whipped cream or vanilla ice cream. Yum!

by Maria Pericozzi | Jun 8, 2023
Kitchen Safety Tips:
Always use a pot holder!
Let people in your home know that you will be using the stove.
Use the claw method when using a knife to avoid any accidents.
Step 1: Prep
Prep your cutting station with a damp cloth and cutting board.
Chop green onions, peanuts, and cilantro.
Cut bell peppers into strips, and shred carrots.
Start boiling a large pot of water.
Step 2: Sauté
Lightly oil your frying pan over medium high heat and start sauteing the peppers and onions. Once tender, add in your garlic, carrots, and green onions.
In a separate pan, scramble eggs.
Step 3: Rice Noodles
Once pot of water is boiling, turn off stove. Put rice noodles into the hot water with a bit of olive oil and gently press noodles down in the water so they are fully submerged.
Soak for 6 minutes.
Pour into the colander and rinse with cold water.
Step 4: Sauce
Whisk all sauce ingredients together in a small mixing bowl until the peanut butter has been fully incorporated.
Step 5: Combine
Combine cooked ride noodles with the cooked vegetables, eggs, and sauce.
Step 6: Serve and Enjoy!
Plate the dish with optional garnishes: chopped cilantro, chopped green onions, and chopped peanuts.
Enjoy!
This meal can be stored in an airtight container for 4 days.
by Maria Pericozzi | Jun 8, 2023
Kitchen Safety Tips:
Do not touch the inside of the air fryer once it has been preheated, always use tongs.
Use only one hand for touching the raw eggs to prevent cross contamination.
Step 1: Preheat & Prep
Preheat air fryer to 370°
Unwrap cheese sticks, set aside.
Add flour, salt, and pepper into a mixing bowl and whisk to combine.
Step 2: Prep
Crack eggs into another mixing bowl and whisk to combine.
Add breadcrumbs and remaining seasonings to another bowl and whisk to combine.
Step 3: 3-Step Breading
Start by placing cheese sticks into the bowl of flour and use one hand (this will be your dry ingredient hand)to mix around, until they have been completely coated. Shake off any extra four.
Drop into egg bowl, do not touch the egg.
Step 4: Egg & Breadcrumbs
Take your other hand and stir cheese sticks until completely coated. Pick up one at a time, let excess egg drip and place into the breadcrumb bowl.
Using your dry hand, coat cheese sticks in breadcrumbs and drop back into the egg bowl.
Step 5: Second Coating
Using your wet ingredient hand, stir cheese sticks until completely coated. Pick up one at a time, let excess egg drip and place into the breadcrumbs.
Using your dry hand, coat cheese sticks in breadcrumbs.
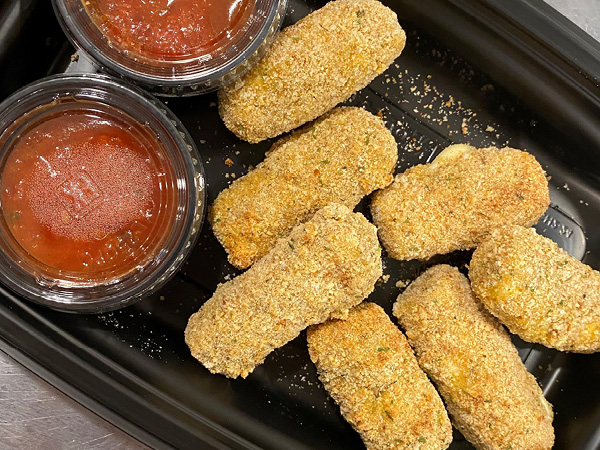
Step 6: Air Fry & Enjoy!
Line air fryer with foil, place breaded mozzarella sticks inside and air fry at 370° for
8-10 minutes or until golden brown.
Serve with marinara sauce for dipping and enjoy!!
by Maria Pericozzi | Jun 8, 2023
Kitchen Safety Tips:
Notify anyone in the kitchen that you will be using the stove.
If you have a metal pot, be sure to use pot holders.
Let your soup cook before digging in to avoid burning your mouth!
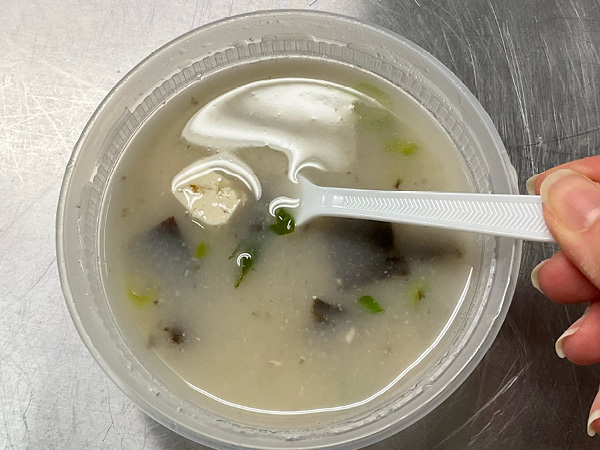
Step 1: Prepare Pot
Measure out 4 cups of water and add to large pot over medium heat
Step 2: Dissolve Miso
Measure out 4 more cups of warm waterand add all the miso paste to the warm water.
Use whisk to dissolve the paste into the water and add to the pot.
Step 3: Prep Veggies
Mince garlic if not already minced
Chop green onions
Chop seaweed into small squares
Step 4: Prep Tofu
Remove tofu from container and blot with paper towel or squeeze gently in a cheesecloth.
Chop tofu into small cubes and continue to blot with a paper towel until you have removed as much liquid from the tofu as possible
Step 5: Fill the Pot
Add everything to the pot! Garlic, green onions, seaweed, and tofu.
Add 4 more cups of water to the pot (now all 12 cups are added)
Season to taste with salt and pepper
Step 6: Finish and Enjoy!
Cook the soup for at least 5 minutes to ensure everything is hot.
Cook on low even longer to develop more flavor.
Ladle some into a bowl and enjoy!

by Maria Pericozzi | Jun 8, 2023
Kitchen Safety Tips:
Always use an oven mitt!
Step 1: Prep
Cut your pie crust into small circles, big enough to fit into each spot of your muffin tin
Preheat oven to 400 degrees
Step 2: Stand Mixer
Place each circle of pie crust on top of each spot on the muffin tin.
Gently press down with only two fingers, to create a bowl shape with the dough inside of the tin.
Step 3: Combine
In a large bowl, whisk together all of the filling ingredients for your pies
Step 4: Scoop
Using a spoon or ice cream scoop, fill each mini pie with your pumpkin mixture
Step 5: Bake
Bake for 10 minutes
Turn down the oven to 325 degrees and bake for another 10 minutes
Step 6: Cool and Enjoy!
Let your mini pies cool for at least 10 minutes
Enjoy on its own, or add some whipped cream or ice cream!!
Store in an airtight container
by Maria Pericozzi | Jun 8, 2023
Kitchen Safety Tips: Always pour hot water away from face.
Always use a pot holder!
TBL – tablespoon
TSP- teaspoon
Step 1: Clean and Boil
Take off husk and silk, place in large pot and bring to a boil OR boil water in a large pot and gently drop corn into boiling water. Boil about 10 minutes
Step 2: Pull
Using tongs, pull corn from water and let water drip off completely (see video)
Step 3: Butter
Spread butter on hot corn.
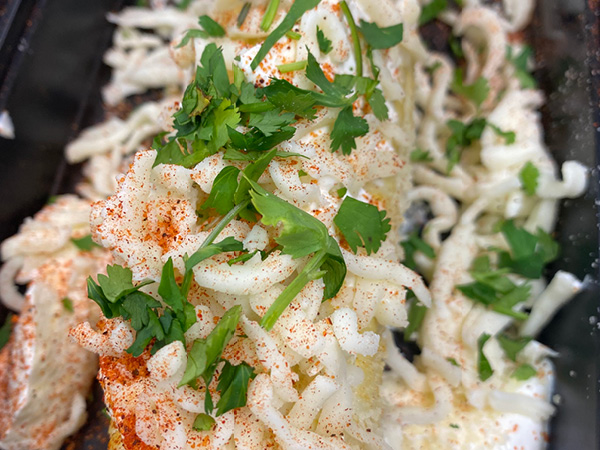
Step 4: Toppings
Add parmesan cheese , Spread on Crème Fraiche, add cheese, shake seasoning and sprinkle cilantro
Step 5: Enjoy
Serve right away!
Step 6: TIPS
Use a fork to eat fallen toppings. Substitute low fat butter, sour cream and cheese for healthier options!
by Maria Pericozzi | Jun 8, 2023
Kitchen Safety Tips:
Always use pot holders.
Notify anyone in the kitchen that you will be using the stove.
Turn off oven when done!
Step 1: Prep and Pre-Heat
Pre-heat oven to 375°
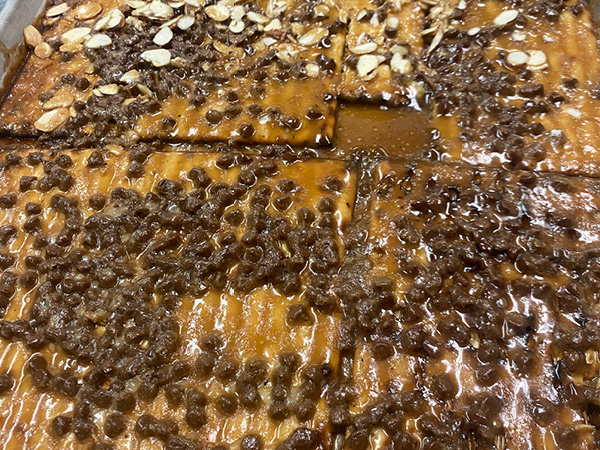
Line a baking sheet with parchment or foil
Cover baking sheet with matzah, breaking pieces go fit
Step 2: Make Carmel
In a small or medium sauce pot, melt 2 sticks of butter and 1 cup packed brown sugar over medium heat.
Once bubbles, let bubble for 3 minutes.
Step 3: Pour and Spread
Pour hot mixture and spread over matzah with spatula.
Leave or add toppings!
Step 4: Bake
Lower oven to 350°
Place baking sheet in oven and check after 7 minutes!
Should bubble but not be burning! If burning, lower to 325° and cook another 8 minutes, 15 in total.
Step 5: Pull and Cool
After 15 minutes, pull from oven (turn off) and let sit out 20 minutes, once cool, place in fridge for 1 hour.
Step 6: Break and Enjoy!
Pull from fridge, break into pieces, and enjoy!
Store in freezer bag in fridge or freezer!