
by Maria Pericozzi | Jun 8, 2023
Kitchen Safety Tips: Use gloves when multiple people are eating a no-bake item!
Oz- ounce
TBL- tablespoon tsp- teaspoon
Step 1: Bake Fish
Pre heat oven to 400 degrees
Line the baking sheet with parchment paper, place fish on there with seasoning of choice (we used chili lime powder).
Bake for 13 minutes
Step 2: make slaw
Mix shredded cabbage with Mae Ploy (about 2 tablespoons per 1 cup cabbage)
Step 3: Make Aioli
Mix 1 cup mayo, ¼ cup parmesan cheese and 2 Tablespoons Siracha Chili Sauce
Step 4: Tortilla and cheese
In a pan or flat griddle, toast tortilla on one side (about 3 minutes), flip and melt cheese (again about 3 minutes)
Step 5: Form Taco
Take melted cheese tortilla, add cooked fish, top with slaw and aioli. You can also add sour cream, jalapenos, tomato, onion, whatever you like
Step 6: Enjoy!
Grab a fork for what falls out of your taco, fold shell and Enjoy!
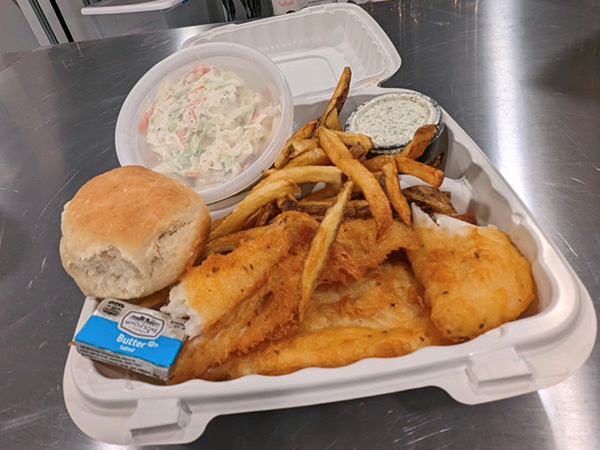
by Maria Pericozzi | Jun 8, 2023
Kitchen Safety Tips:
Be careful when you drop any food into hot oil. It could splash and burn you.
Step 1: Prep
Prep cutting station with a damp cloth and cutting board.
If you don’t have relish, finely chop some dill pickles.
Mince red onion.
Step 2: Tartar
Combine all tartar ingredients into a mixing bowl. Stir with a spatula to combine.
Step 3: Cut Fish
If necessary or desired, cut fish into fillets, or even into fish sticks!
Step 4: Batter
Combine all dry batter ingredients into a mixing bowl and whisk to combine.
Slowly add the soda water and whisk until a pancake batter consistency is formed. You still want to see bubbles. Do not overmix.
Step 5: Fish
Place each piece of fish into the batter and fully coat.
Carefully drop into 375° oil and fry until golden brown.
Step 6: Finish and Enjoy
Serve with your favorite fish fry sides like French fries, coleslaw, or dinner rolls.
Enjoy!
The tartar sauce can be stored in the refrigerator for a week.
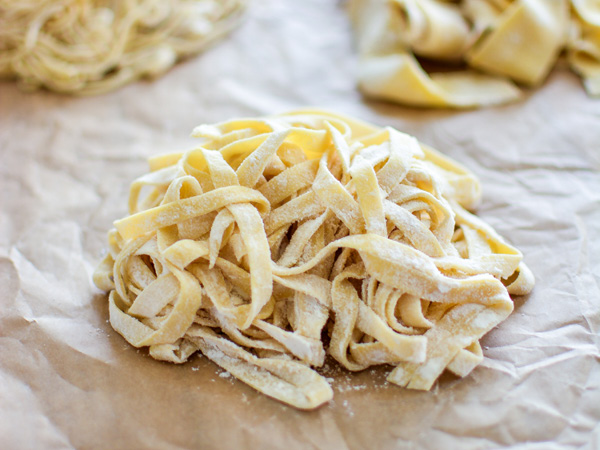
by Maria Pericozzi | Jun 8, 2023
Kitchen Safety Tips:
Always use a pot holder when touching anything on the stove!
Turn off the stove as soon as you are done using it.
Step 1: Form Dough
Add flour, salt, and olive oil to the bowl of a stand mixer. Create a hole in the middle of the flour mixture. Add eggs to the center of that hole.
With the dough hook attachment, mix until a dough forms (about 8 minutes).
Step 2: Proof & Roll
Let dough proof in a warm place for 30 minutes.
Cut dough into at least 4 pieces and start running through your pasta attachment. Start on the widest setting and work your way down.
Step 3: Roll and Cut
You should send the dough through each setting twice. On your first two widest settings, fold the dough in thirds after each pass through to create elasticity. Once dough is your desired thickness, change to the cutting attachment and cut pasta.
Step 4: Nest
Once you’ve cut your pasta, sprinkle flour to coat pasta and arrange in a clump like a birds nest as you work on the rest of the pasta.
Start boiling a pot of water seasoned with salt and olive oil.
Step 5: Boil
Once all of the pasta has been cut, dusted in flour, and nested, you may transfer it to the pot of boiling water to cook.
Cook time will differ depending on the size of your pot and amount of pasta. Check after 5 minutes to see if it is done to your liking.
Step 6: Finish and Enjoy!
Once your pasta is done cooking, drain and serve with your favorite sauce and toppings! Enjoy!
Sauce and topping options:
Marinara, alfredo, pesto, chicken, shrimp, veggies, etc.
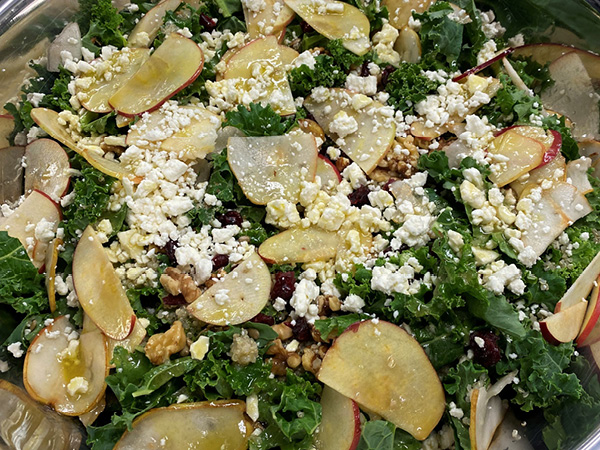
by Maria Pericozzi | Jun 8, 2023
Kitchen Safety Tips:
Be extra careful when handling a knife.
Be sure to use pot holders when touching pots on the stove.
Step 1: Prep & Quinoa
Measure one cup of water and
½ cup dry quinoa and add to small pot. Bring to a boil. Once boiling, add lid, reduce to low, set a timer for 15 minutes.
Prep cutting station and thinly slice apples/pears with mandolin, or as thin as you can get them on your own. Then cut thin slices in half.
Step 2: Kale
Add kale to colander and wash in cold water.
Spin kale in a salad spinner to remove excess water.
Rough chop kale into smaller pieces if necessary.
Step 3: Dressing
Add all salad dressing ingredients into a small bowl and whisk to combine.
Set aside.
*once quinoa is done, set aside with lid off to cool
Step 4: Measure
Measure crasins, walnuts, sunflower seeds, and feta.
Step 5: Assemble
Add dry kale to a large salad bowl. Top with the apple/pear slices, crasins, walnuts, sunflower seeds, and feta.
Step 6: Finish and Enjoy!
Add your dressing to the salad and toss with tongs to coat.
Use tongs to serve into bowls.
Only add all dressing if the whole salad will be eaten soon, or else it could become soggy.

by Maria Pericozzi | Jun 8, 2023
Kitchen Safety Tips:
Let everyone in your home know that you will be using the stove.
Always use pot holders when touching pots on the stove.
Step 1: Prep
Fill a deep pot with water for poaching eggs. Fill double boiler with water. Fill a small pot with water. Bring each pot to a boil on the stove.
Melt butter.
Separate egg whites from egg yolks until you have 1 cup of just egg yolks.
Step 2: Poaching Pt. 1
The poaching water needs to be simmering. Once you hit a boil, turn down to medium to maintain heat. It should be 190°
Add 1 tbsp vinegar to water.
Crack one egg into one small bowl. Continue with about 4 bowls at a time.
Step 3: Poaching Pt. 2
Slowly lower the small bowl with egg into the water and pour egg out. Repeat with others until all 4 eggs are in the water. Set a timer for 4 minutes. Do not disturb the eggs. Then remove from water with a slotted spoon and place on a kitchen towel or paper towel.
Step 4: Hollandaise
Pour lemon juice into double boiler. Turn heat down to medium. Slowly pour egg yolks in while whisking at the same time. Keep whisking or else your eggs will cook.
Then, slowly pour in melted butter while whisking. Do not stop whisking. Sauce will slowly thicken. Stop when you’ve reached your desired consistency.
Step 5: Cook & Toast
Cook Canadian Bacon in a frying pan over medium/high heat until slightly browned.
Toast English muffins until desired crispiness.
Step 6: Plate and Enjoy
Place toasted English muffin on a plate, followed by a slice of Canadian bacon, then a poached egg, and pour hollandaise on top. Garnish with a bit of paprika and Enjoy!
This dish is best served hot.

by Maria Pericozzi | Jun 8, 2023
Kitchen Safety Tips: Always use hot pad or pot holder when using the stove. Clean surface after raw foods such as eggs or meat are on there to avoid cross contamination.
S and P- Salt and Pepper
Step 1: Pre-heat/Spray
Pre- Heat Muffin to 375 degrees
Spray Muffin Tin well
Step 2: Chop
Pick whatever ingredients you would like. Wash and cut veggies, cut meats if you want to use them
**If you have Prepped to Prepare skip to step 4**
Step 3:Eggs
If doing just egg whites, separate yolk from white by cracking egg and gently rolling yolk between shells to pull away white into a bowl… do for all 12 eggs. If whole egg, crack into bowl.
Check for shell, add S and P and water or milk , mix well with fork
Step 4: Pour and top
Pour egg mixture into muffin tins, don’t fill more than halfway
Add toppings
*you do not have to pre-cook bacon*
Step 5 Bake
Place in oven for 15-18 minutes, pull an cool for about 5 minutes. If freezing, let cool for a bit longer before wrapping and storing.
Step 6: Enjoy
Enjoy!
Suggestions: Serve on a bagel or muffin!

by Maria Pericozzi | Jun 8, 2023
Preheat oven to 400 degrees
In a large skillet cook beef until brown over medium heat. Add seasonings and ¼ cup water and cook another minute. Turn off the stove! Transfer meat into bowl.
Spray the muffin tin lightly with cooking spray. Place one wrapper into each up pressing down. Add 1-2 teaspoons of meat into each cup. Add second wonton wrapper on top and add 1 teaspoon meat and toppings… note, these are delicate and suggested to only add 1-3 ingredients per cup.
Carefully place in oven for 8-10 minutes making sure to watch to not burn. Carefully pull from oven, turn oven off and let cool for 5 minutes.
Serving: 2 taco cups
ENJOY and remember, cooking should be FUN and EASY for EVERY1!!!

by Maria Pericozzi | Jun 8, 2023
On low heat, melt oil until liquid
Add cocoa powder and sugar free sweetener
Mix and let cool in refrigerator for about 10 minutes
Dip berries and place on tray, cool again in refrigerator for 10 more minutes
**you can melt oil in microwave by setting at 15 second increments until melted***
If you have Prepped to Prepare: Melt chocolate in microwave until liquid, let sit about 10 minutes, dip strawberries and let cool!
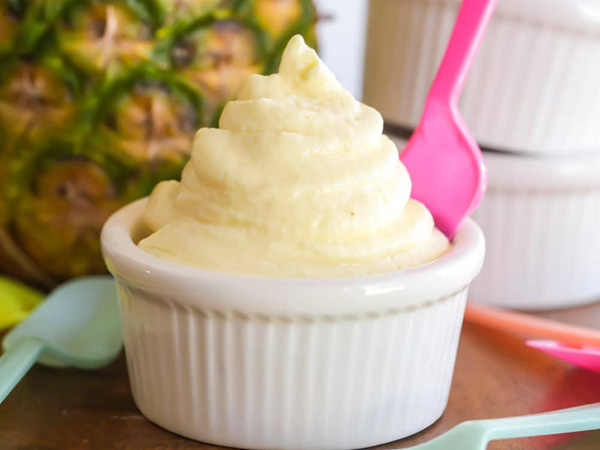
by Maria Pericozzi | Jun 8, 2023
Kitchen Safety Tips:
Let anyone around you know that you will be using the stove.
Always use a potholder!
Step 1: Prep
If using an ice cream attachment for a stand mixer, be sure to put the bowl in the freezer the night before you make this recipe.
It will need to freeze for at least 8 hours.
Step 2: Simple Syrup
Add water and sugar to small pot. Whisk to combine and bring to a boil. Continue to whisk periodically.
Once boiling, remove from heat and allow to fully cool.
Step 3: Combine
Add 1 cup of cooled simple syrup, pineapple juice, and lime juice to a mixing bowl.
Whisk to combine.
Step 4: Ice Cream Machine
Add mixture to your ice cream machine and run for about 20 minutes or until is has reached your desired consistency.
Step 5: OR Freeze
Freeze for at least 8 hours to fully achieve the right consistency.
If it is too hard, add to a blender with a bit more juice.
Step 6: Enjoy!
Add to a bowl or cone and add your favorite toppings!
Suggestions: fresh fruit, honey, agave, granola, etc.
Enjoy!!
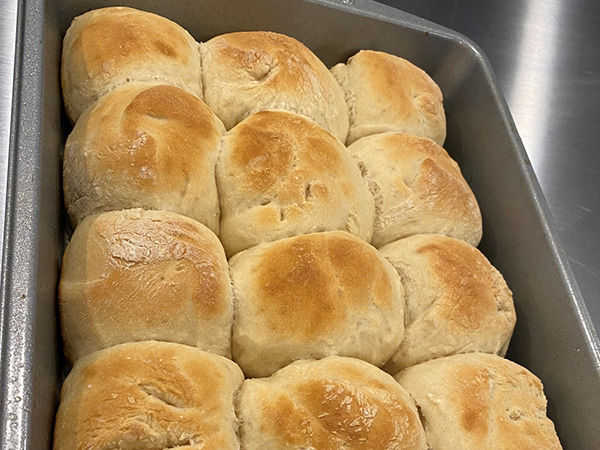
by Maria Pericozzi | Jun 8, 2023
Kitchen Safety Tips:
Always use pot holders or oven mitts when handling pans in the oven.
Step 1: Liquid Ingredients
Preheat oven to 400°
Melt butter.
Add milk, honey, and water to the melted butter.
Heat until 110![]()
Whisk to combine.
Step 2: Yeast
Sprinkle yeast over your hot liquid mixture.
Whisk to combine.
Set aside for 5 minutes. It will start to foam and expand.
Step 3: Dry Ingredients
In a mixing bowl, combine flour and salt and whisk.
Pour liquids into bowl with dry ingredients. Mix with spatula until a dough forms.
Step 4: Knead
Knead dough by hand or put in stand mixer with the dough hook for 5 minutes.
Make sure to flour the surface where you are kneading the dough.
Cover dough with a damp cloth and let sit for 15 minutes.
Step 5: Form Dough
Put dough back on the floured surface and cut into 15 equal pieces.
Roll each piece of dough between your hands to form a ball and arrange in pan.
Cover with damp towel and let sit for 15 minutes.
Step 6: Bake and Enjoy!
Place in 400° oven for 15 minutes.
Enjoy on its own, or with our optional cinnamon honey butter! Just combine all ingredients and enjoy!!