
by Maria Pericozzi | Jun 8, 2023
Kitchen Safety Tips:
Pizzelle iron is HOT so be careful when putting batter on the design, and taking your pizzelle off of the iron.
Step 1: Pre-heat
Plug in your Pizzelle Maker to heat up
Step 2: Dry Ingredients
Whisk together in a bowl- flour, sugar and baking powder
Step 3: Wet Ingredients
Add melted butter, eggs, and vanilla/anise oil to a bowl and mix well with a hand mixer
Step 4: Combine
Add dry ingredients to the wet ingredient bowl and mix well with a hand mixer
Step 5: Press
Depending on your pizzelle maker, you may need to adjust the amount of batter per cookie.
Place a small amount of batter in the center of your pizzelle maker and press for the stated amount of time recommended by your pizzelle maker
Step 6: Cool, Finish and Enjoy!
Let cookies cool for at least 2 minutes
Dust with powdered sugar
Enjoy!!
by Maria Pericozzi | Jun 8, 2023
Kitchen Safety Tips:
Always use an oven mitt!
Let anyone in your home know you will be using something hot to cook your chicken.
Step 1: Prep & Measure
Defrost chicken if necessary.
Make sure you have measuring spoons, as well as a liquid measuring cup.
Step 2: Create Marinade
Add chicken and all ingredients to a mixing bowl or container.
Use tongs or spatula to mix everything together.
Step 3: Let Marinade
Put a lid on the container/bowl or cover with clear plastic wrap and place in the refrigerator for a minimum of 1 hour or overnight.
The longer you marinade, the more flavor!
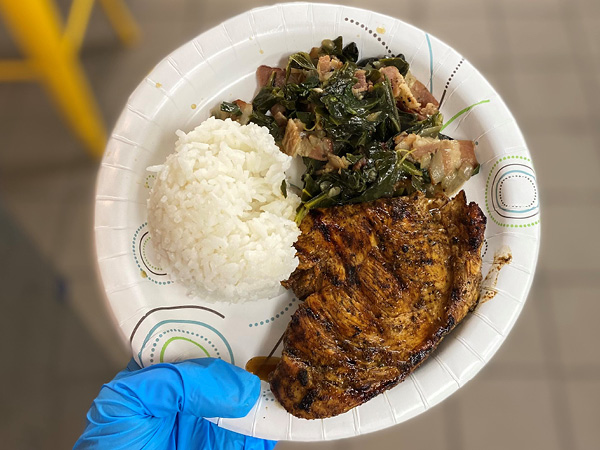
Step 4: Cook Chicken
Once your chicken has marinaded, you may bake, air fry, or grill. Drain excess liquid.
Bake @ 350° for one hour.
Air fry @ 375° for about 15 minutes, flipping halfway through.
Step 5: Grill Option
Grill about 6-8 minutes per side until fully cooked through.
Chicken must reach an internal temperature of 165° to be safe to eat.
Step 6: Enjoy!
Serve with your favorite sides and Enjoy!
This can be stored in an airtight container in the refrigerator for about 3 days.

by Maria Pericozzi | Jun 8, 2023
Kitchen Safety Tips:
Make sure to use an oven mitt when handling pans in the oven.
Use a cutting glove with cutting potatoes
Step 1: Cut and prep
Pre-heat oven to 375 degrees
Cut clean and dried potatoes into ¼ in pieces with a knife or mandolin if available.
Place in bowl and pour in oil and rosemary, thyme, s and p. Mix and side.
Step 2: cook bacon
While cutting potatoes, cook your bacon for about 20 minutes in oven. Use foil or parchment for easy clean up.
Pull and put aside
Increase temp of oven to 450 degrees.
Step 3: Cook potatoes
Place potato slices on baking sheet with parchment or cooking spray. Once oven is to temp, cook for 20 minutes, flip and cook another 15-20 min.
Leave oven on.
Step 4: Adding the rest
Once potatoes are cooked, place in cast iron skillet or metal shallow baking pan.
Chop bacon
Sprinkle potatoes with cheese and bacon, add to the oven for another 5 minutes.
Step 5: Toppings
Turn off the oven.
Top melted cheese with sour cream and chives.
Serve any other topping on the side (ex: salsa)
Step 6: Enjoy!
You can serve and enjoy this with any toppings, we did more traditional here!
Enjoy!!

by Maria Pericozzi | Jun 8, 2023
Kitchen Safety Tips:
Let anyone around you know that you will be using the oven.
Always use an oven mitt when touching any pan that goes into the oven!
Step 1: Dry Ingredients
Whisk flour, salt, and baking powder in a bowl. Set aside.
Preheat oven to 350°
Step 2: Cream Sugar
Add butter, sugar, vegetable oil and vanilla into another mixing bowl and beat for 3-6 minutes with the hand mixer.
If you have a stand mixer, use the beater attachment.
Add each egg one at a time and beat between each addition.
Step 3: Dry & Milk
Add half the dry ingredients to the bowl with butter and sugar. Beat.
Add milk and beat.
Add the rest of the dry ingredients and beat until combined.
Step 4: Bake
Wrap foil around pan and puncture 12 holes to hold each cone. Fill Tray with cones.
Scoop batter into the cones, only filling ¾ full.
Bake at 350° for 15-18 minutes or until fully baked.
Step 5: Frosting
Beat all frosting ingredients in a mixing bowl until light and fluffy. Either use a spoon to frost, or a piping bag.
Let cupcakes cool for at least 10 minutes before frosting.
Step 6: Enjoy!
Frost and decorate! Feel free to use food coloring for the frosting, use sprinkles, or put a cherry on top!
Enjoy!!

by Maria Pericozzi | Jun 8, 2023
Step 1: Prep
Prep your cutting station with a damp cloth and cutting board.
Chop bell peppers, green onions, celery, carrots
Dice onion. Mince garlic.
Using a clean or new cutting board and knife, slice sausage.
Step 2: Roux & Rice
Start your roux by adding butter to a large pot over medium heat to melt. Whisk in flour and continually whisk for about 10 minutes.
Add 2 cups of rice and 4 cups of broth or water to a small pot with lid. Bring to a boil. Reduce to low and simmer for 20 minutes.
Step 3: Sauté
Add in chopped peppers, onions, celery, carrots, and minced garlic. Stir with a spatula and cook a few minutes until tender.
Add in diced tomatoes and 4-6 cups of broth depending on how thick you want your gumbo. Stir to combine.
Step 4: Season & Sausage
Add all seasonings, Worcestershire, hot sauce, and sausage to the pot. Add lid, put stove on high and bring to a boil. Stir periodically.
Reduce to low and simmer for at least 30 minutes or up to an hour. The longer you simmer, the more flavor! Make sure the lid is on.
Step 5: Seafood
Once you are done simmering, add in seafood, stir to combine, put lid on, and turn heat off.
Let the seafood cook in the hot gumbo for a few minutes until cooked through.
Step 6: Serve and Enjoy!
Plate over rice and garnish with fresh parsley.
Enjoy!
This meal can be stored in an airtight container for 4 days.
by Maria Pericozzi | Jun 8, 2023
Kitchen Safety Tips: Always turn tank off after using!!!!
EVOO- Extra Virgin Olive Oil
TBL – tablespoon
TSP- teaspoon
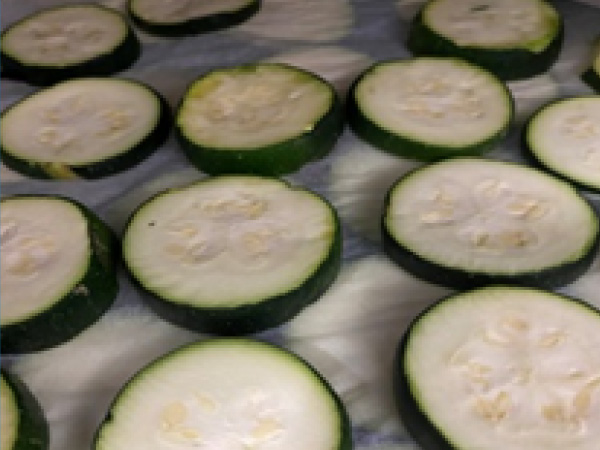
Step 1: Cut Ingredients
Clean and cut ingredients with skin still on. If smaller cuts, put in foil. If larger, put aside.
Step 2: Turn Grill on
Check grill to make sure nothing is in it and it’s clean.
Turn on propane tank and put on high heat.
Step 3: Season/Foil
If using smaller cuts of veggies, place in center of foil, season with oil, S and P, and fold.
If larger pieces, brush oil on both sides then add S and P.
Step 4: Grill
For smaller pieces, place foil pack on grill until you hear it bubbling, then move to top rack (about 4 minutes).
Larger pieces, place directly on grill and flip at 4 minutes. Flip again until desired texture.
Step 5: Pull and cool
After veggies have grill marks and are cooking to desired level of doneness OR about 8 minutes on the top shelf for foil, use tongs to remove from grill and let cool before opening/serving.
Step 6: TURN OFF/ENJOY
Turn GRILL OFF, TURN TANK OFF before you leave the area. Clean off grill with a grill brush.
Serve and ENJOY J
by Maria Pericozzi | Jun 8, 2023
Kitchen Safety Tips:
Always turn off the gas on the grill when you’re done , on the grill and the tank!
Always pull grill away from people and wall
Step 1: Prep
Gather all ingredients and utensils
Step 2: Preheat Grill
Preheat Grill to medium heat
Step 3: Build
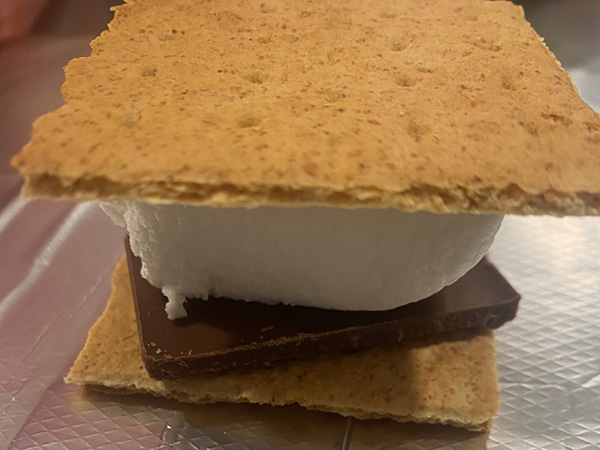
Open foil, layer graham cracker, chocolate and marshmallows.
*1 large cracker, break in half
*3 squares chocolate
*1 marshmallow
Step 4: Place on Grill
After layering graham, chocolate, marshmallow and graham, close foil tight and place on grill for 4 minutes, flip for 2-4 more minutes
Step 5: Cool
Using tongs, pull from grill and let cool for a few minutes, once cool to the touch, open foil
Step 6: Enjoy!
Best served warm! Enjoy 😊
by Maria Pericozzi | Jun 8, 2023
Kitchen Safety Tips:
Make sure to assemble your food processor before you plug it in!
Step 1: Prep
In a blender or food processor, crush Oreo cookies into a fine crumble. Set aside.
In a mixing bowl, whisk together the instant pudding mix and milk. Place in refrigerator for at least 10 minutes to allow it to set.
Preheat oven to 350°
Step 2: Shortbread
Cream together butter and sugar with a hand or stand mixer with the beater attachment until combined.
Add vanilla and flour. Mix until dough is sticking together but slightly crumbly, about 2 minutes. Form into a ball by hand.
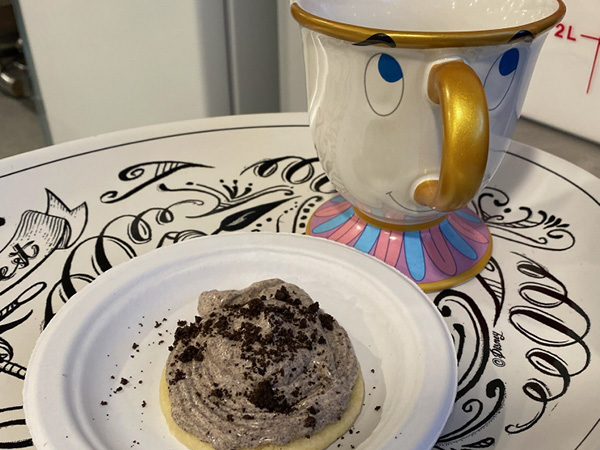
Step 3: Roll & Bake
Roll dough ball in 2 Tbsp sugar and use a rolling pin to roll it out to ¼” thickness. Using a cookie or biscuit cutter, cut 3” circles. Place circles on a parchment lined baking sheet and bake about 12 minutes. They will be light with slight browning on the outside.
Allow to cool completely.
Step 4: Mousse
In a mixing bowl, combine Oreo crumble with vanilla pudding and cool whip, and stir with a spatula. Put mixture into a piping or Ziplock bag.
Step 5: Assemble
Take a cooled shortbread cookie and pipe the mousse on top. Sprinkle with more Oreo crumbs or sprinkles to decorate.
Step 6: Enjoy
Enjoy!
These can be stored in an airtight container in the refrigerator for up to 4 days.
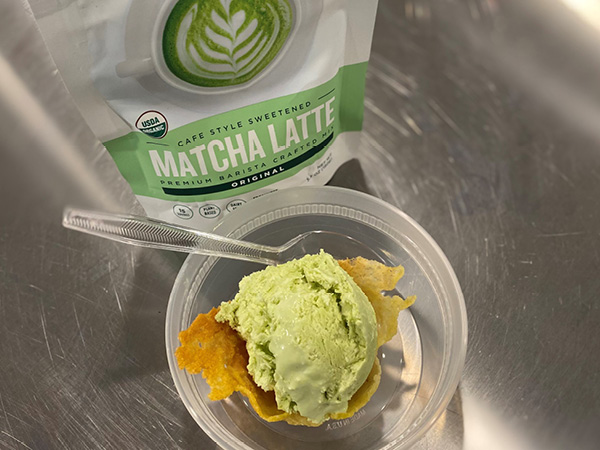
by Maria Pericozzi | Jun 8, 2023
Kitchen Safety Tips:
Make sure all attachments are on your mixer before you plug it in or turn it on
When opening cans, be careful of sharp edges!
Step 1: Measure Ingredients
Measure all ingredients
Step 2: Mix
Add vanilla, heavy cream and matcha powder to the bowl.
Beat until the mixture becomes thick like the consistency of whipped cream.
Step 3: Condensed Milk
Carefully open the can of sweetened condensed milk with the can opener.
Pour entire can into the bowl with the whipped mixture.
Step 4: Fold Together
Gently fold the sweetened condensed milk into the whipped mixture until everything is combined.
Step 5: Freeze
Once everything is combined, transfer mixture into a freezer friendly container with a lid.
Freeze for at least 6 hours, or overnight.
Step 6: Enjoy!
Once frozen, take the container out of the freezer and scoop some into a bowl and enjoy!
Enjoy on its own, in a cone, or with your favorite ice cream toppings.
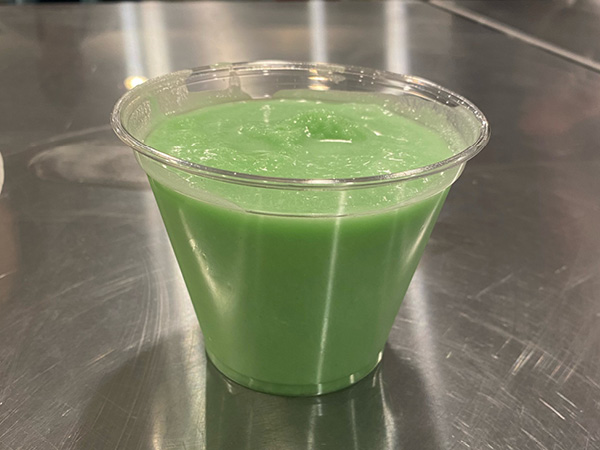
by Maria Pericozzi | Jun 8, 2023
*it’s delicious!*
Kitchen Safety Tips:
Make sure to assemble your mixer before you plug it in!
Step 1: Prep
Use a can opener to carefully open your coconut milk.
Step 2: Blend
Combine all slushy ingredients into a blender.
Blend for about 30 seconds.
Step 3: Freeze
Get your ice cream machine and set it up. Add slushy mix from the blender and run for about 10 minutes or until it reaches a slushy consistency.
Step 4: Assemble
Scoop/pour desired amount of slushy mix into a cup.
Step 5: Enjoy
Enjoy!
I recommend enjoying with either a straw or a spoon.
Step 6: Storage
Extra slushy can be stored in the freezer in an airtight container. When used again, add to a blender with a bit of water or juice to return to a slushy consistency.