by Maria Pericozzi | Jun 9, 2023
Kitchen Safety Tips:
Always use pot holders or oven mitts when handling pans in the oven, or pots on the stove.
Step 1: Prep
Preheat oven to 350°
Measure out all ingredients.
Step 2: Sauté
In skillet, sauté the spinach and the garlic in the butter until the spinach wilts.
Step 3: Mix
In a mixing bowl, combine the cream cheese, sour cream,
1 cup of mozz or jack cheese,
½ cup of parm, and the drained artichoke hearts.
Stir until combined.
Step 4: Combine
Add the cooked spinach into the mixing bowl and continue to mix until everything is combined.
Step 5: Spread & Sprinkle
Spread the mixture into the baking dish.
Sprinkle with remaining cheeses.
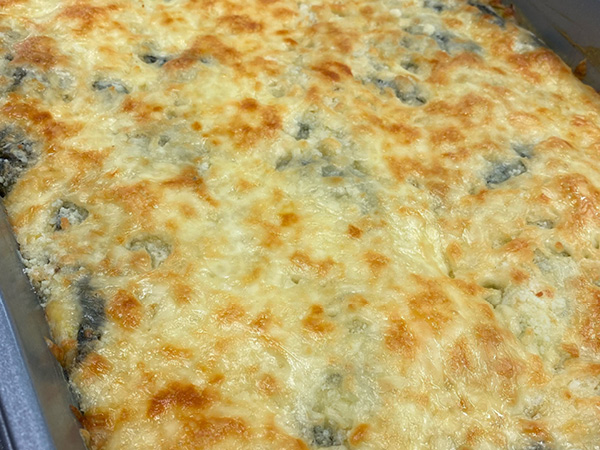
Step 6: Bake and Enjoy!
Bake at 350° for at least 25 minutes or until the cheese has melted. You may also set your oven to broil to help the cheese crisp up a bit.
Serve with chips, crackers, or veggies and enjoy!!

by Maria Pericozzi | Jun 9, 2023
Kitchen Safety Tips:
Make sure to use an oven mitt when touching pans in the oven.
Turn the oven off as soon as you are done using it.
Step 1: Preheat & Prep
Preheat oven to 425°
Prep your cutting station by laying a damp cloth down and placing your cutting board on top.
Very carefully, cut spaghetti squash in half lengthwise.
Step 2: Oil & Season
Use spoon to scoop out all seeds and “guts” from the inside of the squash.
Use pastry brush to spread olive oil all over the inside.
Sprinkle with salt and pepper
Repeat with each half.
Step 3: Bake
Place each half of the squash face down on a parchment lined baking sheet.
Bake at 425◦ for 30-40 minutes depending on the size of your squash. You want it to be tender.
Step 4: Shred and Fill
One squash is tender, carefully flip halves over (remember, it’s hot!) and use fork to shred the inside.
Add desired amount of sauce, cheese, and pepperoni on top.
Step 5: Broil
Put spaghetti squash boats back into the oven on BROIL for 3-4 minutes until cheese is melted and bubbly.
Keep an eye one the oven because you can burn very quickly when broiling.
Step 6: Enjoy!
Let cool and enjoy!!
You can get creative with this dish and add any sort of fillings. Some examples are buffalo chicken, spinach and artichoke, shrimp alfredo, and more!
by Maria Pericozzi | Jun 9, 2023
Kitchen Safety Tips:
Use a cutting glove while using the knife.
Make sure to notify anyone in your home that you will be using the stove.
Step 1: Pasta
Fill large pot with water, place the lid on top, and bring to a boil.
Add a bit of olive oil and salt to the boiling water. Add uncooked pasta. Stir occasionally and cook for 10-12 minutes or until al dente.
Step 2: Pasta Pt. 2
Once pasta is cooked to your liking, pour contents of large pot into a colander in the sink. Run cold water over cooked pasta to stop the cooking process and to cool down.
Step 3: Chop
Prep your cutting station with a damp cloth and cutting board.
Chop tomatoes, bell peppers, cucumbers, and even turkey pepperoni if you want.
Cut to your desired size.
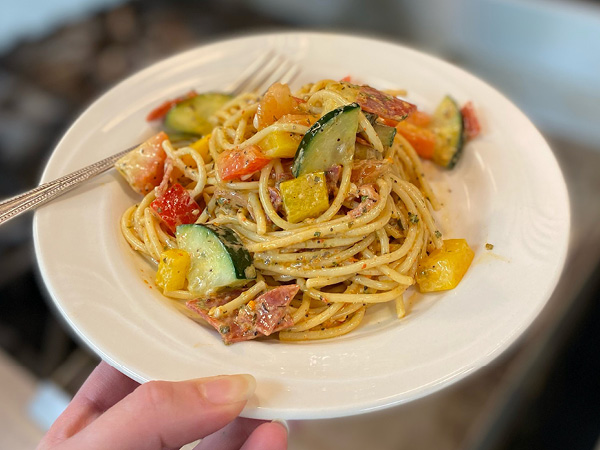
Step 4: Assemble
Put cooked pasta into a mixing bowl. Sprinkle the salad seasoning, Italian seasoning, and parsley onto pasta. Use tongs to toss and coat.
Add all chopped veggies and pepperoni. Use tongs to toss.
Step 5: Dress
Pour both the Italian and Creamy Italian dressing onto pasta. Use tongs to toss.
Step 6: Serve & Enjoy
Serve with tongs onto a plate.
Enjoy!
If saving for later, this can be kept in an airtight container in the fridge for up to 4 days.

by Maria Pericozzi | Jun 9, 2023
Kitchen Safety Tips:
Always use potholders when touching pots on the stove.
Be careful when you drop any food into hot liquid. It could splash and burn you.
Always use an oven mitt when touching pans in the oven.
Step 1: Prep & Active Yeast
Line baking sheets with parchment paper & spray with nonstick spray.
Preheat oven to 400°.
Add active yeast to warm water. Gently whisk.
Let sit for about 5 minutes or until foamy.
Whisk in salt, sugar, and melted butter.
Step 2: Knead
Add flour to liquid mixture, one cup at a time. You do not want the dough to be sticky anymore (you may add about ½ cup more flour if necessary).
Knead dough for 3 minutes.
Cover with a paper towel and let rest for 10 minutes.
Step 3: Form Dough
Once dough has rested you can use a pizza cutter to cut it into strips. Roll strip into a long rope. Take the two ends of the rope and lift up, then twist together, and bring down to create a pretzel shape. You can also make sticks, or nuggets.
Step 4: Boil & Bake
Bring baking soda and water to a boil.
Gently place pretzels into the boiling water for 20-30 seconds and remove with tongs or slotted spoon.
Place on prepared baking sheet and sprinkle with salt, as desired. Bake at 400° for 12-15 minutes.
Step 5: Bechamel
Melt butter in a pot on the stove over medium heat. Whisk in flour. Add milk & seasonings, continue to whisk until it thickens. Turn down to low and cook for about 5 minutes, stirring occasionally until it really thickens.
Step 6: Cheese & Finish
Turn heat off, add cheddar cheese and whisk to combine.
Plate pretzels & cheese together and enjoy!
Both can be stored in an airtight container in the fridge for about 4 days.
by Maria Pericozzi | Jun 9, 2023
Kitchen Safety Tips: Always make sure nothing is in the oven before turning on. Remember to use an oven mitt and turn off when done. Let others know there is a hot surface!
Key: tsp- teaspoon TBSP- tablespoon , S and P – salt and pepper
Step 1: Preheat the Oven
Check to make sure nothing is in oven
Preheat the oven to 400 degrees
Step 2: Sour the Milk
Add vinegar to milk and stir, set aside for 10 minutes
*”sour the milk” a process of adding an acid to milk to give it a tarte taste
Step 3: Mix Dry Ingredient
In a separate bowl mix flour, salt, sugar and baking soda.
Put extra flour down on a clean flat surface
Step 4:Mix in milk
After 10 minutes, mix in the soured milk slowly to the dry ingredients and stir together until dough is formed (looks almost like lumpy cake batter).
Pour onto floured surface
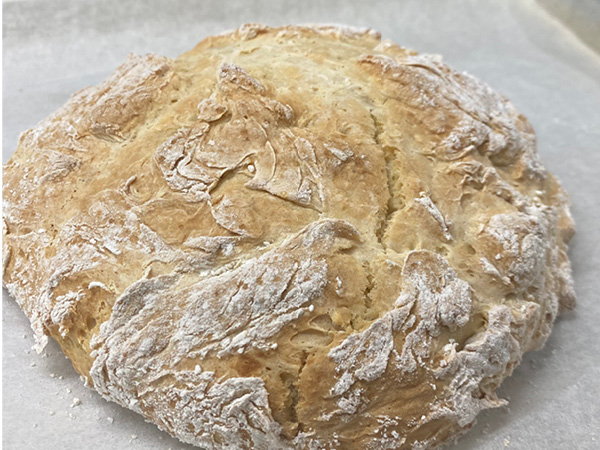
Step 5: Form, Cut, Bake
Knead dough gently and form into a ball, cut an “X” on top to release any gasses that will form.
Put in the oven for 40-45 minutes
Step 6: Serve
Pull, cool and enjoy!!!!
Can be served with butter, cut a hole and use as a bread bowl with soups or dips, make a sandwich!
**go on our YouTube to find Corned Beef and Cabbage Tutorial!**
by Maria Pericozzi | Jun 9, 2023
Kitchen Safety Tips:
Make sure to use pot holders when handling pans in the oven.
Notify anyone else in the kitchen that the oven will be on, to prevent anyone from burning themselves.
Step 1: Prep
Gather all ingredients and utensils
Step 2: Preheat Oven
Preheat oven to 450°
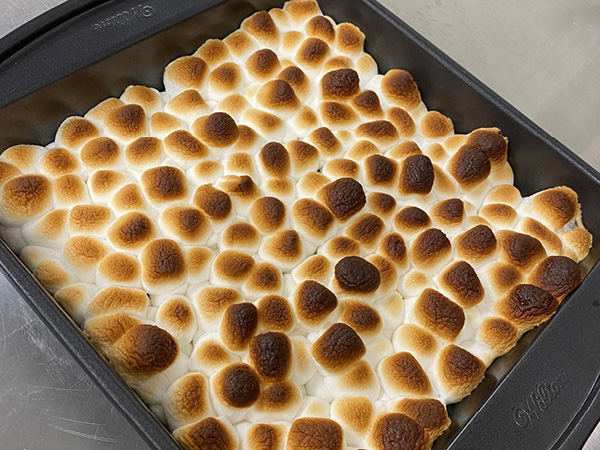
Step 3: Chocolate Chips
Spray baking dish with cooking spray
Cover the bottom of the baking dish with chocolate chips (use more or less, depending on your liking)
Step 4: Marshmallows
Cover the chocolate chips with marshmallows (use more or less, depending on your liking)
Step 5: Bake
Put dip into the oven and bake for about 4 minutes, or until your marshmallows are golden brown.
Step 6: Enjoy!
Serve with graham crackers, fruit, or any other yummy dippers!
This dip is best served warm.
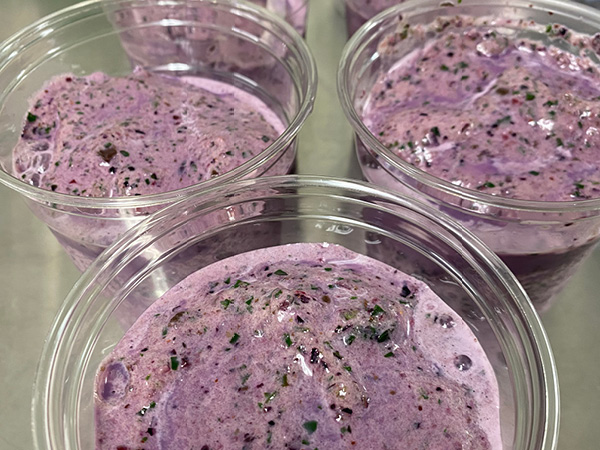
by Maria Pericozzi | Jun 9, 2023
Kitchen Safety Tips: Make sure your blender is secure and the lid is on all the way! NEVER put metal or your hand into the blender as there is a sharp blade on the bottom!!!
Step 1: Blender
Make sure the blender is set to off before plugging in. Make sure you have a cleared off space.
Step 2: Pick Ingredients
Pick whatever ingredients you would like. At minimum, use frozen fruit and liquid, but add anything else you would enjoy.
Step 3: Add
Measure and add ingredients to the blender.
Again you can add different veggies, if you are into supplements, add your protein powder here!
Make sure to have extra liquid ready to add.
Step 4: Cover and Blend
Make sure that lid is on TIGHT before you blend.
If Ingredients don’t smoothly blend together, add more liquid by turning off the blender, pouring more, lid back on and blend.
Step 5:Pour
If your smoothie is thick, you might have to use a spatula to get it out. Please don’t use a spoon or hand since there is a blade in there!
Step 6: Enjoy
No need to cool, just Enjoy!
*if you have frozen ingredients, you should put them away first so they don’t melt!

by Maria Pericozzi | Jun 9, 2023
Kitchen Safety Tips:
Always make sure people know the crockpot is on and use on a cleared safe flat surface.
Clean area with chicken and use gloves when raw.
If you are uncomfortable using a knife, ask someone for help.
Step 1: Prep
Wash your produce.
Cut lettuce and dice the tomato and onion.
Step 2: Cook Chicken
Turn crockpot onto high, lay 3 chicken breasts in the bottom and add 1 ½ cups of water, add in seasoning (1 Tbsp or half of a standard seasoning packet).
Cook on high for 4 hours or low for 6,until chicken is cooked all the way
Step 3: Shred
Shred chicken with 2 forks, place into chicken and pull apart. Be careful when doing this as the crockpot is hot.
Step 4: Fajitas
Melt cheese on the fajita shell and layer chicken and veggies on top. Add sour cream or salsa!
Other optional toppings: jalapenos, black olives, guacamole, corn.
Step 5: Store and clean
Store extra chicken to use for salads or nachos! Make sure to clean your crockpot using warm soap and water and only the ceramic insert!
Step 6: Enjoy!
Enjoy this healthy Taco option!!!
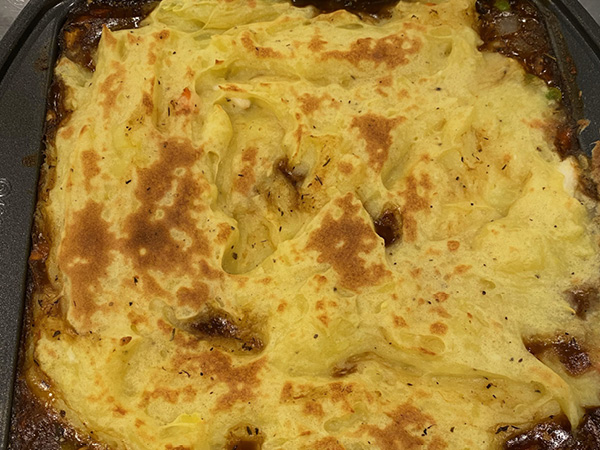
by Maria Pericozzi | Jun 9, 2023
Kitchen Safety Tips:
Make sure to use pot holders when handling pans in the oven or pots on the stove.
Notify anyone else in the kitchen that the stove and oven will be on, to prevent anyone from burning themselves.
Step 1: Prep
Peel potatoes and carrots. Chop potatoes into large chunks and dice carrots.
Clean and chop celery, dice onion, chop mushrooms.
Step 2: Potatoes
Put potatoes into the medium pot with water, garlic powder, onion powder, and salt.
Bring to a boil and cook for 15 minutes.
Drain, add ¼ cup of vegetable broth, then mash with potato masher or immersion blender.
Step 3: Sauté Veggies
Add 1 Tbsp of the vegetable broth into the deep skillet along with the carrots, celery, onion and garlic.
Cook on medium heat until veggies are softened, about
8-10 minutes.
Step 4: Finish Veggies
Add the mushrooms, tomato paste, cornstarch, thyme, and balsamic vinegar to the skillet, stir to coat.
Add remaining vegetable broth, bring to a boil, lower heat, and stir constantly until thickened.
Step 5: Assemble
Before removing skillet from heat, stir in the peas.
Spread the veggie mixture evenly into the 8×8 baking dish.
Spread mashed potatoes evenly on top of the veggie mixture.
Step 6: Bake and Enjoy!
Broil in the middle rack at 500° for 15 minutes, or until the potatoes are slightly browned.
Enjoy!!

by Maria Pericozzi | Jun 9, 2023
Kitchen Safety Tips:
Make sure to never put your fingers inside the blender.
Step 1: Prep
Gather all ingredients and utensils needed.
Step 2: Scoop
Scoop ice cream into blender using the ice cream scoop.
Step 3: Add Ingredients
Add milk or heavy cream, peppermint extract and green food coloring into the blender.
Step 4: Blend
Blend all ingredients until you are happy with the consistency. You may need to add more milk if it is too thick.
Step 5: Toppings
There are so many options for toppings! You can go with the classic whipped cream and a cherry, or try something else:
Chocolate chips, chocolate syrup, caramel syrup, candy cane pieces, and more!
Step 6: Enjoy!
Finish your milkshake in whatever toppings you choose, and Enjoy!!