by Maria Pericozzi | Jun 7, 2023
Kitchen Safety Tips:
Always use an oven mitt when handling trays in the oven!
Turn off oven when done using it.
Step 1: Yeast
Dissolve yeast and 1 Tbsp sugar in 1 ¾ cup of warm water. Set aside.
Step 2: Mix Ingredients
Whisk oil into yeast mixture, then whisk in 4 eggs one at a time, then add sugar and salt.
Gradually add flour until a dough forms and holds together.
Step 3: Knead
Knead dough on a floured surface until smooth, or use the stand mixer with dough hook to knead.
Step 4: Rise
Grease a bowl and return kneaded dough to bowl, cover and let rise in a warm place for 1 hour (it will double in size).
Punch down dough, cover, and let rise again in a warm place for 30 minutes.
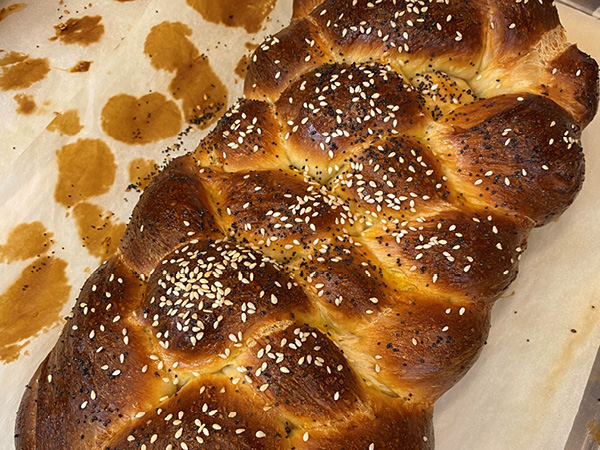
Step 5: Braid
Depending on what type of braid you are doing, divide dough into even pieces. Roll out pieces into long logs all the same length. Braid dough and place on parchment lined baking sheet.
Step 6: Bake and Enjoy!
Preheat oven to 375°
Place bread in fridge to rise another hour.
Brush with remaining egg. Sprinkle seeds. Bake for 35-40 minutes or until golden.
Enjoy!
by Maria Pericozzi | Jun 7, 2023
Kitchen Safety Tips:
Always use an oven mitt!
Be sure to add any attachments to your mixer before you plug
them in.
Step 1: Preheat & Prep
Preheat oven to 350°
Add 1 Tbsp ground flax and 2 Tbsp water to a small bowl or ramekin, stir, and set aside.
Step 2: Cream Butter & Sugar
Add brown sugar, butter, ginger, cinnamon, pepper, and anise to bowl and mix with a hand mixer for about 3 minutes, until everything is combined and fluffy.
Step 3: Vanilla & “Egg”
Stir your ground flax and water mixture.
Add vanilla and flax egg to butter and sugar mixture and mix until fully incorporated.
Step 4: Dry Ingredients
Add whole wheat flour, baking powder, baking soda, and salt to a mixing bowl and whisk to combine.
Add dry ingredients to the bowl with wet ingredients and mix with a spatula to combine.
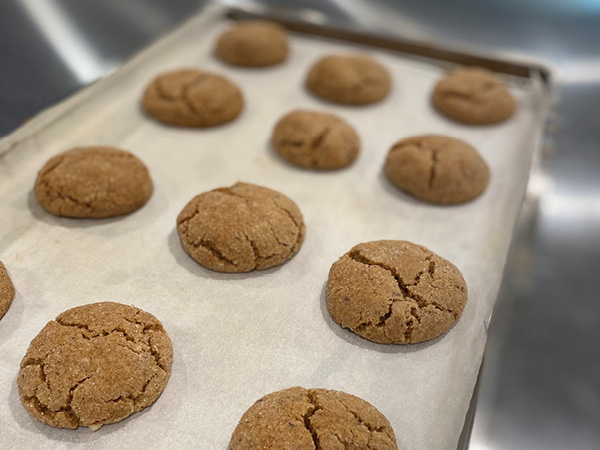
Step 5: Scoop & Roll
Use a cookie scoop roll dough into a ball. Roll dough ball in granulated sugar to coat. Place 12 cookies on a parchment lined baking sheet.
Step 6: Bake & Enjoy!
Bake at 350° for about 10 minutes or until a toothpick comes out clean.
Let cool for 5 minutes before serving.
Enjoy!!
by Maria Pericozzi | Jun 7, 2023
Kitchen Safety Tips:
Always check the oven before turning on
Always use oven mitts
Make sure carrots are fresh!
Step 1: Pre-heat/Prep Tin
Pre-heat oven to 400 degrees
Fill your muffin tin with liners, or use a cooking spray to make sure your muffins do not stick to the tin
Step 2: Dry/Wet Ingredients
Whisk together in a bowl- flour, brown sugar, cinnamon, baking powder and baking soda and salt.
In a separate bowl- whisk together beaten eggs, vegetable oil, carrots and milk.
Step 3: Combine
With a spoon or spatula, add your dry ingredients into your bowl of wet ingredients. Make sure to do half at a time to avoid a mess!
Step 4: Add to tin & Bake
Using scoop or a spoon, fill each muffin liner in the tin ¾ of the way!
Bake at 400 for 20 minutes.
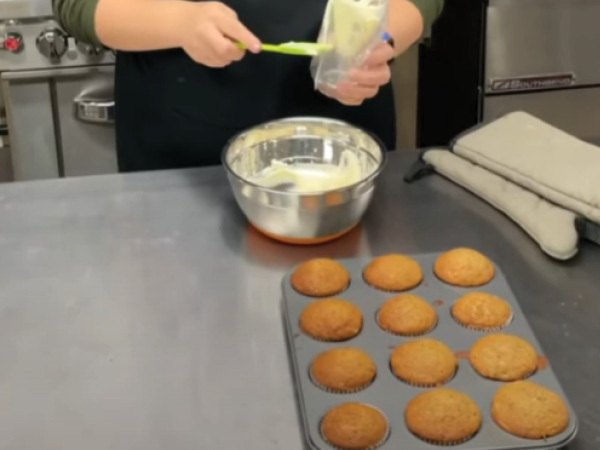
Step 5: Frosting
Beat butter and cream cheese in a bowl until creamy. Slowly add the powdered sugar a little at a time and continue beating. Then add salt and cream and beat about 3 more minutes until you have a nice frosting consistency.
Step 6: Finish and Enjoy!
Let muffins cool for at least 10 minutes before frosting.
Once your muffins are cool, use a knife to spread on the frosting, or use a ziplock or pastry bag to pipe frosting onto muffins and enjoy!!
(Store in the fridge because of the cream cheese frosting)

by Maria Pericozzi | Jun 7, 2023
Kitchen Safety Tips:
Be extra careful when handling a knife.
Be sure to use pot holders when touching pots on the stove.
Step 1: Cut
Prep cutting station with a damp towel and cutting board. Use either a knife or mandolin to thinly slice apples and onions.
Use knife to slice brie into slivers.
If you have a block of cheese, shred the cheddar.
Step 2: Onions
Heat olive oil in frying pan over medium high heat. Add sliced onions. Cook until fragrant. Once you can smell your onions, add salt, and stir to combine. Reduce heat to low and continue to cook for about 30 minutes until onions have browned.
Step 3: Butter
Take room temperature butter and add sage. Stir to combine.
Spread sage butter onto one side of each slice of bread.
The buttered sides will be the outside of the sandwich.
Step 4: Assemble
Lay one slice of bread, butter side down, layer cheddar cheese, apple slices, caramelized onion, and brie. Put the other slice of bread on top, butter side out.
Step 5: Fry
Heat frying pan over medium high heat. Place sandwich, butter side down, and fry until golden brown. Flip, and continue to fry until the other side is also golden brown.
Step 6: Enjoy!
Remove from frying pan.
Cut sandwich in half.
Serve and Enjoy!!

by Maria Pericozzi | Jun 7, 2023
Kitchen Safety Tips: Make sure this is refrigerated since using cheese!
To make Manicotti as well, use the QR code (both recipes)
Step 1: Mix
Mix cheese, sugar, amaretto and chocolate chips together until frosting like consistency
Step 2: Bag
Place bag into a cup to stabilize and fold over the top, make sure corner is down. Fill with mixture.
Step 3: Pipe
Cut the end of the bag and squeeze into shell
Step 4: Dip
Dip ends into chocolate chips if you would like
Step 5: Serve
If not eating right away, place in refrigerator until ready… ENJOY
Step 6: Options
Other ways to enjoy:
Crush shell and squeeze on top.
Add to ice cream
Layer in between cake
Use a spoon and just enjoy!

by Maria Pericozzi | Jun 7, 2023
Kitchen Safety Tips:
Make sure to use a pot holders when touching anything on the stove.
Turn the stove off as soon as you are done using it.
Step 1: Measure & Prep
Measure out all ingredients.
Wash & scrub apples very well to remove wax coating. Push a popsicle stick into each apple.
Attach candy thermometer to pot.
Step 2: Heat
Add all ingredients to pot and stir.
Put pot on stove over medium-high heat.
Step 3: Hard Crack Stage
Watching very carefully, wait until pot has reached 300° on the candy thermometer. This is when our candy has reached the hard crack stage.
Using pot holders, immediately remove from heat.
Step 4: Dip
Carefully dip apples into the hot cinnamon candy. Lift and let excess drip back into the pot.
Place on parchment paper to cool.
Step 5: Dip Again!
Dip a second time if you would like, or dip as many apples as you can!
Step 6: Enjoy!
Enjoy!!
Apples can be stored at room temperature in an airtight container for up to 5 days.

by Maria Pericozzi | Jun 7, 2023
Kitchen Safety Tips:
Always use an oven mitt!
Chef’s Tip:
You can substitute plant based milk if needed
Step 1: Pre Heat
Pre Heat oven to 350 degrees
Step 2: Mix
In a mixing bowl, mix together cake mix, milk, oil and egg. Don’t worry if it seems thick.
Step 3: Add
Once the mix isn’t lumpy, add chocolate and sprinkles.
Gently mix
Step 4: Bake
Place in the center rack of the oven using an oven mitt.
Cook for 18-20 minutes. Check with a toothpick OR fork
Step 5: Cool
Wait until completely cool and cut
Step 6: Enjoy!

by Maria Pericozzi | Jun 7, 2023
Kitchen Safety Tips: Always use pot holders.
Notify anyone around you that you will be using the stove.
Be careful whenever you are using a knife, especially cabbage because it is very hard!
Step 1: Sauté Veggies
Put large pot on the stove and add a bit of olive oil to the bottom of the pan and turn on medium heat.
Dice the onion and green pepper and add to the pot to start sautéing your veggies.
Step 2: Bacon
Cut bacon into smaller chunks and add to the pot to begin cooking.
We are looking for our veggies to be tender, and the bacon to be cooked through.
Step 3: Cabbage
Cut the stem off your cabbage and cut into thin strips.
Put the cut cabbage into the colander and wash it under cold water.
Step 4: Season
Once your cabbage is washed, you may put it into the pot and add your turkey stock.
Seasonings can be very personal. Add the seasonings to your liking.
Stir everything together.
Step 5: Cook
Put the lid on the pot and cook on a medium heat for about 15 minutes, stirring occasionally.
The longer you cook, the more tender your cabbage will be. Cook to your desired tenderness.
Step 6: Enjoy!
Serve and Enjoy with your favorite meal!
Check out our recipe for Cornbread Muffins and you can pair that for a delicious snack!
by Maria Pericozzi | May 31, 2023
Kitchen Safety Tips:
Make sure to use a pot holder when touching pots on the stove.
Turn the stove off as soon as you are done using it.
Step 1: Pasta Dough
Using a stand mixer with the dough hook, add all pasta dough ingredients and mix on a low setting until a dough forms. You may speed it up towards the end to bring the dough together.
Using the pasta attachment, flatten dough until you can slightly see through it like stained glass.
Step 2: Cut Ravioli
Place pasta sheet on a well-floured surface.
Use biscuit cutter to cut pasta dough into as many circles as you can get. Remember each ravioli will need 2 pasta sheet circles.
Line circles up in two rows, a top row, and a bottom row.
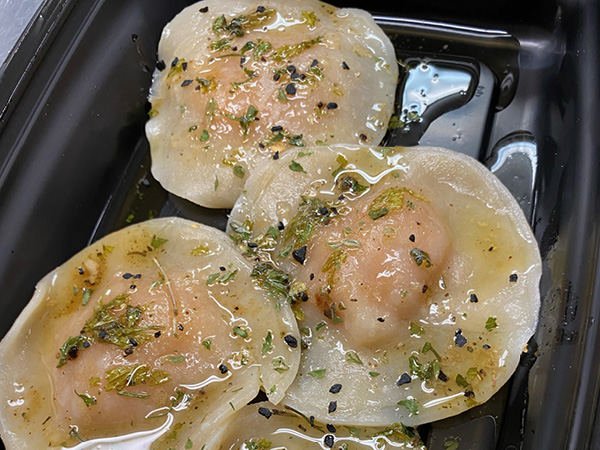
Step 3: Fill & Seal
Place a small amount of puree on the bottom row of pasta sheet circles.
Place a circle from the top row over your bottom piece that has filling. Press all along the outside of the circle to seal the ravioli shut.
Step 4: Boil
Boil water in sauce pot with a bit of olive oil and salt.
Carefully drop ravioli into boiling water for 4 minutes.
Once cooked, remove with slotted spoodle or strain in a colander.
Step 5: Sauce
Melt butter in frying pan over medium high heat. Add sugar, Italian seasoning, and sage.
Continuously move pan over the heat and cook until butter is browned.
Be careful to keep it moving or else your butter will burn!
Step 6: Garnish
Place ravioli on plate, top with browned butter sauce. Sprinkle black garlic and parsley on top.
Enjoy!!

by Maria Pericozzi | May 31, 2023
Kitchen Safety Tips:
Make sure to use pot holder when touching pots on the stove.
Turn the stove off as soon as you are done using it.
Step 1: Prep
Prep your cutting station by laying a damp cloth down and placing your cutting board on top.
Chop carrots, celery, and onion. Cut squash in half and scoop out seeds.
Step 2: Boil & Sauté
Place squash into one large pot with water and boil for 20 minutes.
Place olive oil, carrots, celery, onion, and garlic in another large pot and sauté until tender.
Step 3: Boil
Once veggies are tender and your squash is ready, scoop out the inside of squash and add to pot. Do not add any of the skin.
Add all remaining ingredients to the pot and bring to a boil.
Step 4: Blend
Once soup is boiling, turn off stove. Using your immersion blender, blend soup until smooth.
If using a regular blender, carefully pour soup into blender and blend.
Step 5: Cool & Toppings
Once blended, let soup cool before eating.
Optional toppings:
Sour cream, plain yogurt, sunflower seeds
Step 6: Enjoy!
Enjoy!!
This can be stored in an air tight container in the fridge for about 3 days. You could also portion and freeze to have an easy meal later!